
This chapter contains the following topics:
Introduction to Customer History
Printing a Customer History Report
View Customer History by Document Number
The Customer history selection enables you to obtain information about an invoice after it has been fully paid and purged. This selection helps you to answer customer queries about accounts. You may view customer history (by date or by document number), or you may print it. This selection also lets you purge customer history.
Customer history is a historical record of open items which have been fully paid and purged from A/R Open Items. If you have chosen (in Control information) not to keep customer history, this chapter does not apply. If you do keep history, customer history is created automatically when you purge open items in Fully paid open items.
If you retain customer history, you will be using additional hard disk space. The Customer History can be purged periodically, so you may keep only as much history as is needed to answer routine customer queries.
You may choose to view the history of individual invoices, or to print a report showing a range of invoices.
This selection enables you to print a report showing documents which have been purged from Open Items. A total for each customer and a summary total for all the documents and customers selected is printed
You may select a range of customers and a range of dates. You may further limit the report to documents associated with one A/R account.
See a sample Customer History report in the Sample Reports appendix.
Balance-forward customers
For balance forward customers, the report also shows the amount which was retained as a balance forward document in Open Items when the document was purged. In this case, the document total shown on the report is the amount purged, and does not include the amount retained in Open Items.
For instance, for an invoice for $200, with $75 being retained as a balance forward document in Open Items, the amount purged and shown in the invoice total would be $125. The $75 retained in Open Items would be shown immediately below the line for the invoice.
Open-item customers
Documents are printed in apply-to number sequence for open item customers.
Select
Customer History from the Reports, customer menu.
Graphical Mode
The following screen appears:

Character Mode
The following screen appears:
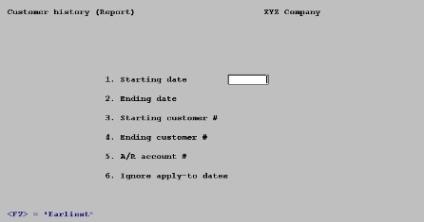
Enter the following information:
Enter the range of dates to be included in the report, or use the option:
Options
|
<F2> |
From the "Earliest" starting date or "Latest" ending date |
|
Format |
MMDDYY |
|
Example |
Press <F2> at both fields |
Starting customer # and
Ending customer #
Enter the range of customer numbers to be included in the report, or use the option:
Options
|
<F2> |
For the "First" starting customer or "Last" ending customer |
|
Format |
12 characters |
|
Example |
Press <F2> at both fields |
Enter the number of the A/R account for which documents are to be included, or use one of the options:
Options
|
<F1> |
For next entry in A/R accounts |
|
<SF1> |
For the previous A/R account |
|
<F2> |
For the default A/R account from A/R Control Information |
|
<F5> |
To include documents for "All" A/R accounts |
|
Format |
Your standard account number format, as defined in |
|
Example |
Press <F5> |
Check the box to ignore the apply-to dates and leave it unchecked print invoices if any apply-to documents fall in the date range.
With the box unchecked, if one or more of the documents with that apply-to number has a document date which is within the date range specified the invoice will print on the report.
If you checked the box, then only invoices that fall within the document date range will print on the report.
|
Format |
Check box, checked is yes and unchecked is no. The default is unchecked. |
|
Example |
Press <Enter> to use the default. |
Make any changes as needed, or press <Enter> or click on the OK button to print the Customer history report.
This selection lets you view customer history by its date.
Select
Customer history by date from the View customer history menu.
A screen like the following displays:
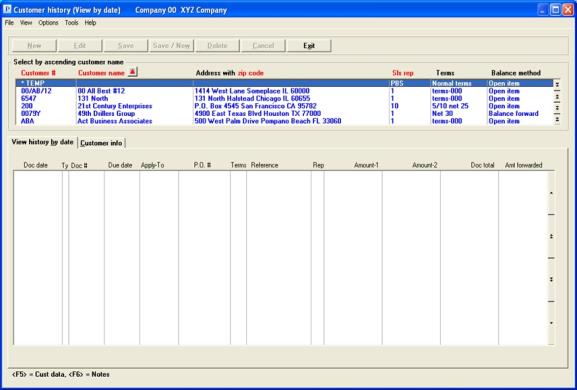
View Customer History by Date List box
The upper list box displays up to 6 customers at a time. You may sort the customers by customer number, customer name, zip code or sales rep all in ascending or descending order. Only column names in red may be sorted. To select a field or change the sort order, click on the column name or the arrow to the right of the column name or use the View options.
To locate a customer, start typing number or name depending on which sort field is selected.
Options
In the customer list box you also have these other search options:
|
Down arrow or <F1> |
For the next customer |
|
Up arrow or <SF1> |
For the previous customer |
|
Page Down |
For the next group of customers |
|
Page Up |
For the previous group of customers |
|
End |
For the last customer |
|
Home |
For the first customer |
The customer information that displays is available for viewing only.
Once you have found the correct customer, search for a starting document date by doing the following:
Using the mouse, click anywhere in the lower list box or use the <Tab> key to highlight the first record in the lower list box.
Then type the starting date. The search format is MM/DD/YYYY. You will need to type the full 4-digit year. The search box looks something like this:

As soon as you type in the last number for the year, the program starts the search and locates the exact date or the closest date forward if there is no history document with the exact date.
Options
When searching for a history item you have the same type of search options as with the customer list box.
From this screen you may also do the following:
|
Options > View customers open items |
To view open items for the customer selected. |
|
Options > View invoice history |
To view the invoice or credit memo in A/R invoice history. It will locate the exact or closest invoice that matches the Apply-to number on the highlighted line |
| Options > View invoices |
To view an open invoice or credit memo for the customer selected. |
|
<F5> |
For more information about the customer on the Customer info tab |
|
<F6> |
To display and enter notes about this customer. For character mode refer to the Using Notes section of the Use of Functions keys, Toolbar and Menus chapter of the System User documentation. |
Select the Exit button when finished.
Character Mode
Enter the following information:
Customer #
Enter the customer number, or use one of the options:
Options
|
<F1> |
For the next customer, in customer number sequence |
|
<SF1> |
For the previous customer |
|
blank |
To look up a customer by name |
|
Format |
12 characters |
|
Example |
Type 300 |
Upon selection of a customer, that customer’s name, address, terms, and balance method display.
Starting customer name
If you left the customer number blank, enter the name (or just the leading characters of the name) of the customer you want to view. Upper / lower case is significant. You may use one of the options:
Options
|
<F1> |
For the next customer, in customer name sequence |
|
<SF1> |
For the previous customer |
|
blank |
To return to looking up the customer by number |
|
Format |
25 characters |
|
Example |
(displays automatically because you pressed <F2> for |
Start date
Enter the date of the oldest purged items to view, or use the option:
Options
|
<F2> |
For the Earliest item |
|
Format |
MMDDYY |
|
Example |
Press <F2> |
The following screen appears:

Up to fourteen documents display at one time. Select from these options:
Options
|
<Enter> |
For more information about the items on the screen |
|
<F5> |
For more information about the customer |
|
<F6> |
To display or enter notes about this customer. Refer to the Using Notes section in the Use of Function Keys, Tool Bar and Windows chapter of the System User documentation. |
Either open item or balance forward documents are displayed, depending on the currently-assigned customer balance method. If documents of the opposite balance method exist within the range selected (because you have changed a customer’s balance method), a warning message appears on the screen. You can obtain information on these documents by using the Customer History Report.
The screens for open item and balance-forward customers are similar except that Amt-forwarded appears only for balance-forward customers. This displays the amount for that customer which was forwarded as a balance forward entry. Refer to the Printing a Customer History Report section as to how this is computed.
To exit, press <Esc>.
This selection lets you view customer history by its document
number.
Select
Customer history by doc # from the View customer history menu.
A screen similar to the following will appear:
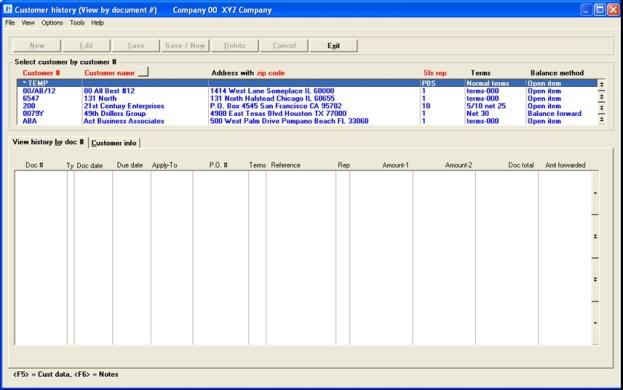
View Customer History by Document Number List box
The upper list box displays up to 6 customers at a time. You may sort the customers by customer number, customer name, zip code or sales rep all in ascending or descending order. Only column names in red may be sorted. To select a field or change the sort order, click on the column name or the arrow to the right of the column name or use the View options.
To locate a customer, start typing number or name depending on which sort field is selected.
Options
In the customer list box you also have these other search options:
|
Down arrow or <F1> |
For the next customer |
|
Up arrow or <SF1> |
For the previous customer |
|
Page Down |
For the next group of customers |
|
Page Up |
For the previous group of customers |
|
End |
For the last customer |
|
Home |
For the first customer |
Once you have found the customer, then you may locate the document. The default search is by document number.
By default the screen is sorted in document number order. If necessary select <F2> for the document number sort.
Using the mouse, click on the lower list box or use the <Tab> key to move the focus to the lower list box.
Type the document number. Starting with the first number entered and the search box will display. The program will immediately begin filtering for the document closest to the number entered. As you type in more characters it will get closer until the document is found. Select the <Esc> key to exit the search window.
To search for a different document number for the same customer, type in the new number.
View history by apply-to # tab
Select the <F3> key for the apply-to sorting.
Using the mouse, click on the lower list box or use the <Tab> key to move the focus to the lower list box.
Type the apply-to number. Type the first number entered and the search box will display. The program will immediately begin filtering for the document closest to the number entered. As you type in more characters it will get closer until the record with that apply-to is found. Select the <Esc> key to exit the search window.
To search for a different apply-to number for the same customer, type in the new number.
Options
When searching for a history item you have the same type of search options as with the customer list box.
From this screen you may also do the following:
|
Options > View customers open items |
To view open items for the customer selected. |
|
Options > View invoice history |
To view the invoice or credit memo in A/R invoice history. It will locate the exact or closest invoice that matches the Apply-to number on the highlighted line |
| Options > View invoices |
To view an open invoice or credit memo for the customer selected. |
|
<F5> |
For more information about the customer on the Customer info tab |
|
<F6> |
To display and enter notes about this customer. For character mode refer to the Using Notes section of the Use of Functions keys, Toolbar and Menus chapter of the System User documentation. |
Select the Exit button to return to the menu.
Character Mode
If viewing by document number, a screen appears for you to enter the customer number, document number, and document type (invoice, CR memo, DR memo, finance charge, or payment).
Enter the following information:
Customer #
Enter the customer number or use the options:
Options
|
<F1> |
For the next customer |
|
<SF1> |
For the previous customer |
|
blank |
To look up a customer by name |
|
Format |
12 characters |
When you select a customer number, the terms and the balance method fields automatically show what was set up in Customers.
Document #
Enter the number of the document you want to view. You may leave this blank to view Cash items. (The Doc type field is automatically set to Payment.)
|
Format |
8 characters |
Doc type
Enter the type of document you want to view:
|
B |
For Balance forward |
|
C |
For Credit memo |
|
D |
For Debit memo |
|
F |
For Finance charge |
|
I |
For Invoice |
|
P |
For Payment |
|
R |
For Returned check |
|
Format |
One letter from the list above |
|
Example |
Type I |
Balance-forward customers
Choose one of these options:
Options
|
<F1> |
To reselect a customer |
|
<F5> |
To display more information on this customer |
|
<F6> |
To display or enter notes on this customer. Refer to the Using Notes section of the Use of Function Keys, Toolbar and Windows chapter of the System User documentation. |
If open item documents exist for this customer, you are advised of this.
Open-item customers
Choose one of these options:
Options
|
<F1> |
To reselect a customer |
|
<F2> |
To display documents with the same apply-to number as the document selected |
If balance forward documents are also exist for this customer, you are advised of this.
If you press <F2> to display all documents with the same apply-to number, up to fourteen documents display at one time and the following options are available to you:
Options
|
<Enter> |
For more information about these documents |
|
<F5> |
For more information about the customer |
|
<F6> |
To display or enter notes about this customer. Refer to the Using Notes section of the Use of Functions keys, Toolbar and Menus chapter of the System User documentation. |
This selection enables you to purge documents by date, customer and/or account number. A report of the documents purged prints automatically.
See a sample Purge Customer History report in the Sample Reports appendix.
Select
Purge customer history from the Utility menu.
Graphical Mode
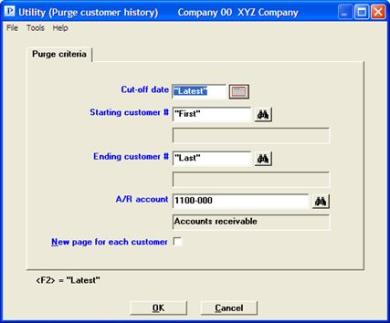
The following screen appears:
Character Mode
The following screen appears:
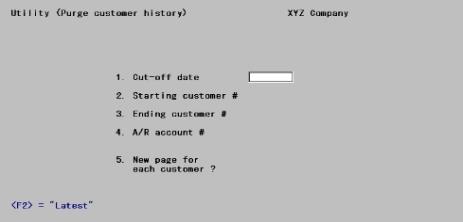
Enter the following information to determine the range of documents to be purged from Customer History:
This controls the purge by date. Documents dated on or before this date will be purged:
| • | For balance forward customers, only the document’s own date is considered. |
| • | For open item customers, all the invoices paid by a single document must be older than the cut-off date in order for any of them to be purged. |
Enter the cut-off date, or use the option:
Options
|
<F2> |
For Latest (purges documents without regard to date) |
|
Format |
MMDDYY |
|
Example |
Type 31410 |
Starting customer # and
Ending customer #
Enter the range of customers whose documents are to be purged. The ending customer number must be greater number than the starting customer number.
You may also use the option:
Options
|
<F2> |
For the "First" starting customer number or "Last" ending customer number |
|
Format |
12 characters |
|
Example |
Press <F2> at both fields to purge all customer history |
If there is only one account in A/R accounts this field is defaulted to that account and this field may not be changed.
Enter the A/R account number associated with the documents to be purged. This must be a valid entry in A/R accounts. You may use one of the options:
Options
|
<F1> |
For the next entry in A/R accounts. If there is only one entry, the <F1> and <SF1> options do not appear. |
|
<SF1> |
For the previous A/R account |
|
<F2> |
For the default A/R account from Control information |
|
<F5> |
For All A/R accounts (purges documents regardless of account number) |
|
Format |
Your standard account number format, as defined in |
|
Example |
Press <F2> |
Check this box for a page break between customers.
|
Format |
Check box, checked is yes and unchecked is no. The default is unchecked. |
|
Example |
Leave it unchecked |
Make any needed changes, then select OK to purge or Cancel to return to the menu.
Are you sure ?
If you answer Yes to this, documents in the ranges are purged of all data; the data will no longer be available. Answer No to return to the Cut-off date field. The default is No.
You must select a printer. Use the keyboard or mouse to select a printer. Once you have selected a printer, then use the Select button to print and purge or Cancel to return to the Cut-off date field.
Purge Customer History report listing the purged data is printed when you select a printer. This report is an audit trail and may not be directed to the screen.
If there is no history within the selected parameters, then the message "No customer history records in range selected" will display.